Arduino-NodeJS-360-Video-Player
In this project, I created a 360 video player (currently playing a demo mp4 file) and a controller with Arduino UNO.
Watch Demo Video (youtube)
Requirements:
- Arduino UNO
- ITG/MPU GY-521 Sensor module
- USB-cable for serial connection between the development board and the computer
- Arduino IDE or any other IDE for Arduino
- NodeJS (v12.14.1 tested)
- Typescript (v4.2.3 tested)
- Localhost server for client
- A cup of coffee and a nice Spotify playlist
Build Arduino controller
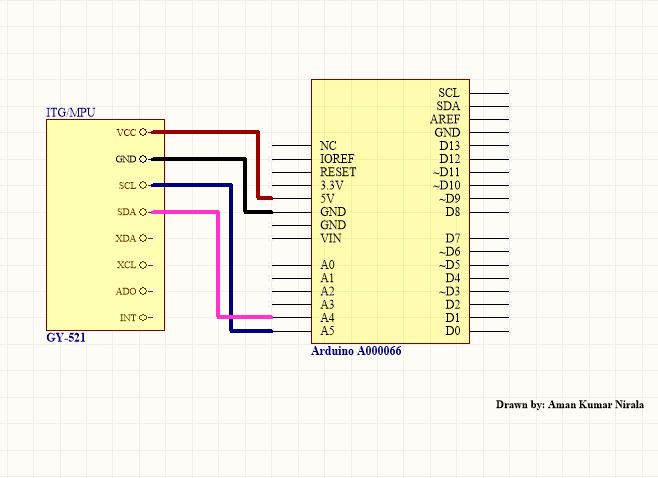
For making the arduino controller you need the Arduino development board and a ITG/MPU 3-axis Acc. and Gyro. sensor board (I am using GY-521 here). Follow the circuit diagram below to build your circuit.
Once the cicruit is build, we need to program the micro-controller. Download the script and open it in ArduinoIDE or any IDE of your choice and flash it to the arduino.
Now you can open up a serial console and check if your arduino is giving you the desired output or not. The output should look something like this:
91,46,-154
109,57,-152
98,21,-156
104,35,-171
96,51,-149
124,52,-142
118,66,-155
After we have done this we need to change the code of our index.ts in the /server/script folder.
Open the file and look for the variable portname and change it to the port to which your arduino is connect. For me it would be:
// Defining the port name: This is the port to which your arduino is connected.
// Change it to the name of the port to which you have connected your arduino
const portName = 'COM10';
Now we are done with the controller part. Lets to some Typescripting now and build our server and client.
Build Server and Client script
To build the server-side code, follow these steps:
- Download the repository and head to the server folder.
-
In the terminal type the following command to install node modules:
npm install - Open the same index.ts file in /server/script folder and look for the variable called socketPortNumber
- Change the value of the variable to socket number you want to start listening for a connection. For me it would be:
// Defining port number: (Change this port number to the port you want to make a socket connection though) const socketPortNumber = 3000; - Optionally you can also change the prepix for the socket connection from “/arduino” to anything you like. For me it is:
// Assigning a prefix. When a client tries to connect to the host with this prefix, a socket connection is established // between the client and the listening server socketServer.installHandlers(server, { prefix: '/arduino' }); - Once the modules are installed and port numbers are assigned we are ready to build and start our servers.
-
To build the TS files into JS, run the following command
npm run-script build -
To start the server, run the following command:
npm run-script start
Note: The start command automatically builds the TS files as well, so you cant skip the build step and directly run the start command.
For building the client, do the following changes:
Change the url for socket connection to local host as follows:
http://127.0.0.1:[socket port number]/[socket prefix]
For me it would be:
//socket connection from the server
let sock = new SockJS("http://127.0.0.1:3000/arduino");
Once this is done, run the following command in the www folder:
tsc
Go though the generate JS files and remove the lines that are surrounded by the remove comment block
Finally,
- Start your localhost with the index.html, make sure the NodeJS server is running, arduino is programmed and connected to the serial port.
- Wait for the socket connection to establish.
- Once that is done, you are ready to go!
Gallery


